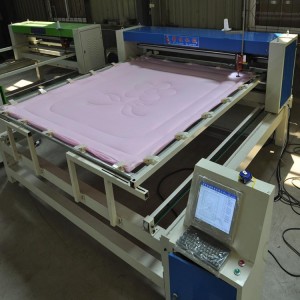
The main function
1) Automatic sewing of any pattern.
2) Sew with equal stitches. Convenient array spacing and needle speed modification operation.
3) There are two types of back-up stitching available, and the stitch length of back-up stitching can be specially treated.
4) Forward and reverse quilting and provide air-in, air-out, and threading buttons.
5) Large hook, twice the amount of thread of the standard hook.
6) When the machine stops, the needle will automatically stop at the high position.
7) The section line is automatically detected and the machine stops.
8) Real-time display of quilting status and operation tips.
9) Automatically return to the origin.
10) The setting and modification function provides convenient setting and modification of stretching frame limits.
11) The pattern track search function enables the needle to be positioned quickly.
12) The system test function can quickly detect all aspects of the machine for maintenance.
13) Over-the-boundary, over-power and other protection functions.
14) Provide two sets of devices, the dynamic presser foot and the fixed presser foot, which are convenient for users to choose.
15) Piece counting and reset function.
16) Pattern browsing function.
17) Through the setting of the pattern margin, the pattern can be automatically scaled.
quilting machine
Two preparation knowledge and machine routine adjustment
2, 1 needle
Because the quilted material is thicker, and when the needle is under the cloth, the cloth is still moving and deformed due to tension, so the required needle is thicker. Generally, it is 18#–21#, and the rigidity of the needle is better. The machine needles of German Singer MR5 brand are used now. If it is necessary to use a thinner 16# needle, the needle distance should not be greater than 3.5mm, and the needle speed should also be reduced to avoid skipped stitches and broken threads.
2. Winding and installation of bobbin
The winding of the bobbin should be neat and tight, but not too tight, otherwise the bobbin will be easily deformed; the amount of winding should not exceed the outer diameter of the bobbin. Put the bobbin into the bobbin case, pull the end of the thread through the thread slot, and pull it out from the thread hole under the tension spring. When pulling the bobbin thread, the bobbin should rotate in the direction of the arrow. The tension of the bobbin thread should not be too high. Adjust its tightness by turning the clamping screw on the bobbin case. It should be noted that when the bobbin is loaded into the bobbin case, it should not be higher than its end edge, otherwise it will cause the needle to break.
2, 3 sewing thread
The thread used for quilting requires the upper thread to be a three-strand polyester thread with a large twist. Using good-quality upper thread can reduce thread breakage and skipping during sewing; silicone oil or single-strand polyester thread is better; there is no special requirement for the bottom thread.
2, 4 thread tensioner and wire breakage sensor
1) Tension adjustment of the thread tensioner: Turn the thread tensioner adjustment nut clockwise to increase the tension of the suture, and turn left to decrease the tension.
2) Adjustment of the jumper yellow swing amount: Loosen the positioning screw, turn the thread clamp, pull the upper thread, and adjust the jumper yellow swing amount to 3-5 mm.
3) Adjustment of jumper spring tension: Loosen the screw, take out the thread clamp, loosen the set screw, turn the clamp screw clockwise, the tension will increase, otherwise, the tension will decrease. It is generally required that it is looser, as long as the jumper spring can swing when the upper thread is pulled.
4) Adjustment of the disconnection sensor: the disconnection alarm is realized by contacting or not contacting the jumper spring with the disconnection alarm contact piece. Long-term contact is disconnected, non-contact or pulsating contact is continuous. If there is no alarm when the line is broken or the alarm is not continuous, it is called a false alarm. For the former, mainly check whether the jumper spring is in contact with the contact piece or if there is dirt on the contact piece, resulting in poor contact; for the latter, check whether the insulation layer of the contact piece and the substrate is short-circuited, and if there is a short circuit, the jumper spring and the contact piece are always in contact It is judged as a disconnected state. In addition, there is no alarm when the bottom thread breaks.
2, 5 loose upper thread device
In the quilting thread pulling process, in order to avoid the upper thread from being pulled, it is required that the upper thread is in a slack state when pulling the thread. This device pulls a small lever to eject the ejector rod in the thread tensioner through the suction action of an electromagnet, so that the two tension discs are released to play the role of feeding the upper thread. The function is the same as the knee lift function in the sewing machine. After the electromagnet is released, the tension disc should return to its original position; if it cannot be in place, check whether there is any stuck place, otherwise it will be a phenomenon such as sewing throwing.
2.6 Adjustment of the garden presser foot
1) The presser foot is jumping when the machine is running, and it is required that the presser foot should not touch the needle plate when it is at the lowest position. The size of the gap should be adjusted according to the thickness of the object to be quilted, preferably 3-5 mm, and the adjustment method is as follows: remove the machine head cover, and use a screwdriver to loosen a fastening screw that fixes the presser foot rod. Move the presser foot lever to a suitable position, and then tighten the screw. After adjustment, ensure that the needle is in the center of the presser foot hole.
2) The motion relationship between the presser foot and the needle bar: when the presser foot is at the lowest position, the needle just drops to the bottom surface of the presser foot. The requirements can be met by adjusting the eccentric wheel at the notch on the right of the machine head; when adjusting, use the two fastening screws on the eccentric wheel to rotate the eccentric wheel until the required position is found, and then tighten the screws.
3) Adjustment of the up and down movement of the presser foot: Sometimes it is necessary to increase the movement of the presser foot for thicker materials, loosen the adjustment nut, and increase the upward movement of the adjustment screw, and decrease the downward movement, and then Just make it tight.
4) If the fixed presser foot is selected, please remove the parts of the movable presser foot connecting presser foot, and install it with the provided fixed presser foot device.
2. Adjustment of 7 needles and hook
It is very important to master the adjustment of the rotary hook for the normal operation of the machine.
1) The relationship between the needle and the hook: turn the needle bar to the lowest position, turn Huajian towards the front, and make the needle rise back by 1 mm. At this time, the tip of the hook is at the center of the needle bar and above the upper edge of the needle hole. —2 mm, that is, it is located on the plane of the groove line; the gap between the needle groove line surface and the tip of the hook is 0, and there is a gap that is prone to skip stitches and thread breakage.
2) After the positioning hook is installed, it should be ensured that the gap between the positioning hook stopper protrusion and the thread-passing gap of the hook bed is -1 mm.
3) Adjustment method: remove the presser foot, needle plate and positioning hook, loosen the three fastening screws on the rotary hook; Turn the spline at the front to raise it up by 1 mm; turn the tip of the hook to the center line of the needle, and fix one of the screws. If the tip of the rotary hook is not in the middle of the plane of the groove line above the needle hole, remove the front cover of the machine head, loosen the fastening screw of the needle bar, move the needle bar in place and fasten it; then check the needle and the rotary hook After the sharp gap meets the requirements, fasten all the fastening screws of the rotary hook, and align the protrusions of the positioning hook with respect to the center line and install them.
Note: The requirements for the adjustment of the rotary hook of the quilting machine are higher than those of ordinary sewing machines. One is that the direction of sewing is arbitrary, and the other is that the fabric is still moving when the needle is under the cloth, resulting in the phenomenon of pulling the needle and touching the needle of the rotary hook; The shuttle grinds Xun faster and is more frequently adjusted than the rotary hook of a sewing machine. For different fabrics, there may be some changes in the parameters when adjusting thick or thin materials, which need to be explored in practice and accumulate experience. If the tip of the hook is a bit worn, there will be less collision between the needle and the tip of the hook, which can solve the thread skipping problem. In addition: When adjusting the rotary hook, you should also pay attention to relevant parts, such as whether the needle bar and needle sleeve are worn, whether there is movement in the front and rear of the rotary hook shaft, whether there are burrs at each thread passing point, the bevel gear in the machine base and the small synchronous pulley of the machine head. Check whether the fastening screws are fixed on the platform, and whether the drive belt is loose or creeping.
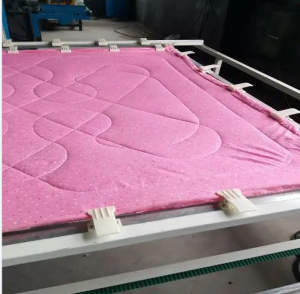
quilting machine pictures
REHOW Textile Machinery
An enterprise specializing in textile machinery manufacturing, it is committed to providing high-quality mechanical equipment and technical solutions for the global textile industry.
Mainly produce quilting machines, fabric slitting machines, high-speed looms, cloth inspection machines, cloth packaging machines, embroidery machines and other textile equipment. We have independent research and development capabilities and a complete quality management system. All products have undergone strict quality testing and certification to ensure product stability and reliability.
Post time: Jun-21-2023


